
In this article, I will cover some different ways you can use to easily enable SharePoint spaces in a modern SharePoint site.
This is the first article of a series I aim to publish as I review the options currently available in SharePoint spaces. Stay tuned for future content.
SharePoint Spaces series
- Part 1 – Easily enable SharePoint spaces
- Part 2 – SharePoint Spaces structures
Introduction
In summary, we can describe SharePoint spaces as:
SharePoint spaces is a web-based, immersive platform, which allows you to create and share, secure and extensible mixed reality experiences. Add a new dimension to your intranet by using 2D and 3D web parts to create your mixed reality vision.
https://www.exploresharepointspaces.com/
When you create a new SharePoint modern site, spaces are not enabled by default. They become available by enabling the Spaces feature in the site. This can be done manually via site settings, or programmatically using the feature with Id 2ac9c540-6db4-4155-892c-3273957f1926.
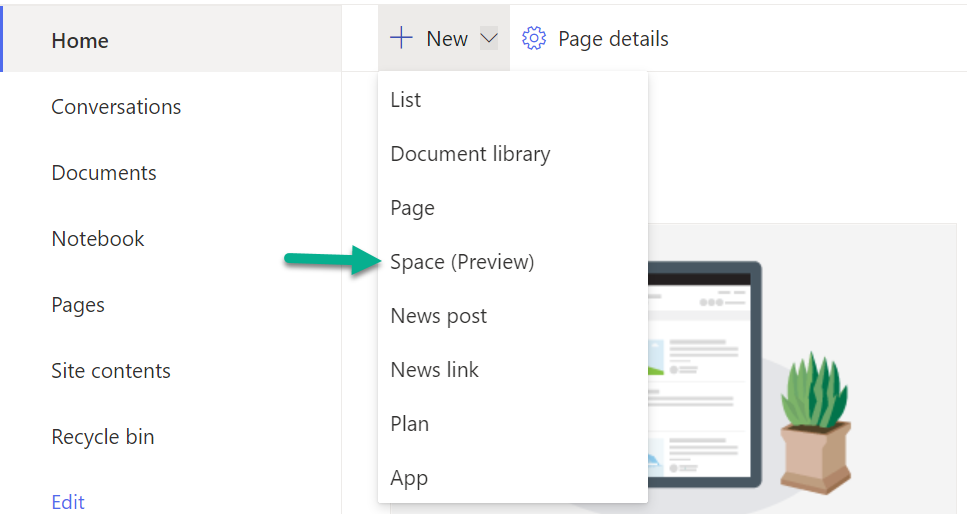
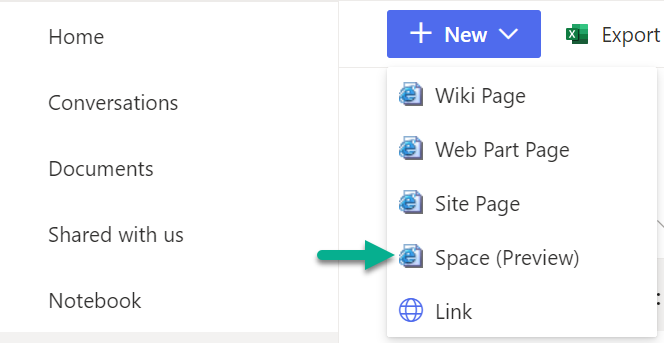
The feature activation adds the Space (Preview) content type to the Site Pages library, and the option to create a new Space appears in two places.
In the homepage toolbar:
And also in the New menu of the Site Pages library.
But let’s see some different options to easily enable the Spaces feature.
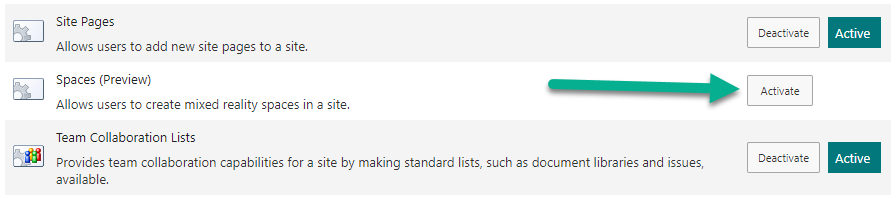
Manually
To enable the SharePoint Spaces feature manually, go to Settings ➡ Site information ➡ View all site settings ➡ Manage site features. In the site features page, click the Activate button for the Spaces feature.
PowerShell
We can easily enable the feature in PowerShell using PnP PowerShell
Enable-PnPFeature -Identity 2ac9c540-6db4-4155-892c-3273957f1926 -Scope Web
CLI for Microsoft 365
Similar to PowerShell, we can easily enable the feature from a command-line interface using CLI for Microsoft 365
m365 spo feature enable --url https://contoso.sharepoint.com/sites/spacesdemo --featureId 2ac9c540-6db4-4155-892c-3273957f1926 --scope Web --force
PnP provisioning template
If using a PnP based provisioning engine to control the creation of sites, you can simply add the following feature activation element to your XML template
      <pnp:Features>
        <pnp:WebFeatures>
          <pnp:Feature ID="2ac9c540-6db4-4155-892c-3273957f1926" />
        </pnp:WebFeatures>
      </pnp:Features>